DENON DJ PRIME 2

SETUP
Switch to Computer mode
When the Prime 2 is powered on, it will be set to Standalone/Engine mode. To switch to Computer mode and control VirtualDJ you need to ...
- press on the Computer icon at the Prime 2 screen
- or hold down for a second the VIEW button at the center-top panel of the device, select SOURCE, then pres on the Computer icon.
Firmware & Drivers
Firmware : Update the firmware of the unit to the latest available version from https://www.denondj.com/downloads
Drivers : (Windows only) Download and install the latest Windows drivers from https://www.denondj.com/downloads . It is strongly advised to install drivers prior plugging the unit to a USB computer port.
No driver is necessary to be installed on Mac OSX computers.
Note Due to Denon SDK incompatibility, the screens will be operational on Mac OSX 10.14 or later.,
VirtualDJ 8 Setup
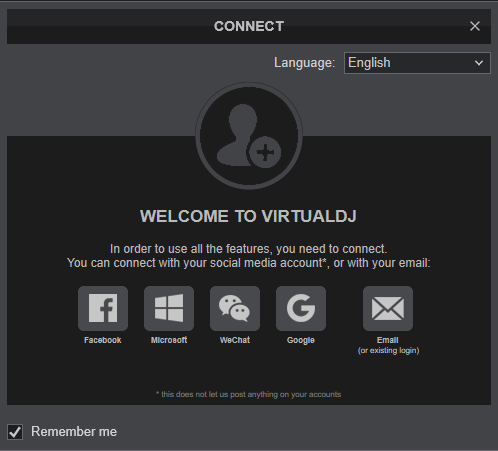
Once VirtualDJ is opened, a Login Window will appear. Login with your virtualdj.com account’s credentials.
A Pro Infinity or a Pro Subscription License is required to use the Denon DJ Prime 2. Without any of the above Licenses, the controller will operate for 10 minutes each time you restart VirtualDJ.
http://www.virtualdj.com/buy/index.html
Select the Prime 2 button in order VirtualDJ to apply the pre-defined audio configuration (speakers need to be connected to the rear side of the unit in this case), or Computer if you don't have any speakers to connect to the Prime 4 and need to output sound from the default sound card of your computer.
If you are on Windows and you have not installed the Denon Driver, you will be prompt to do so.
Click to OK
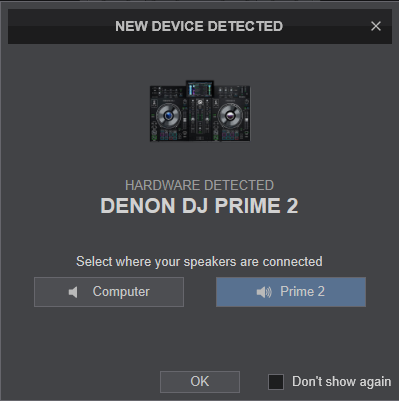
The unit is now ready to operate.
MIDI Operation
The unit should be visible in the MAPPING tab of VirtualDJ Settings as 3 devices (Denon DJ Prime 2 for the main unit and 2 more for the Left and Right LCD Displays) and the “factory default” available/selected from the Mappings drop-down list for all 3 of them.
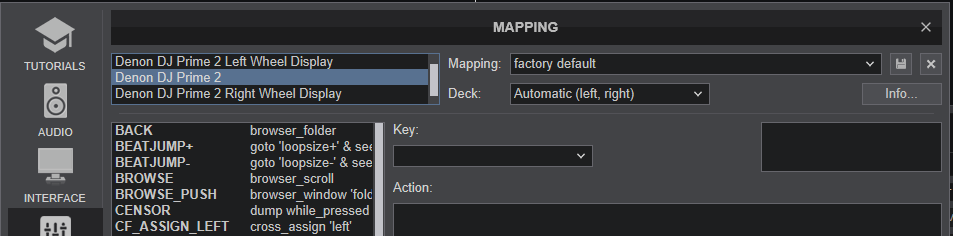
The factory default Mapping offers the functions described in this Manual, however those can be adjusted to your needs via VDJ Script actions.
Find more details at http://www.virtualdj.com/wiki/VDJ8script.html
AUDIO Setup
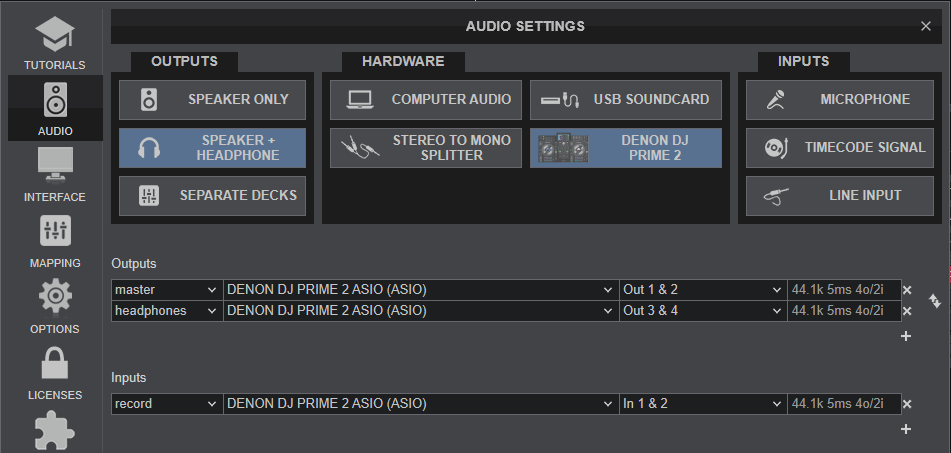
The unit has a pre-defined Audio setup and a special button in the AUDIO tab of VirtualDJ Settings to provide that.
See also Inputs & Recording.
For further software settings please refer to the User Guide of VirtualDJ 8.
http://www.virtualdj.com/manuals/virtualdj8/index.html
LAYOUT

The functionality of each button, knob and connection per section (as shown in the image above) will be explained in detail in the next chapters
S SHIFT: Press and hold this button to access secondary functions of other controls on the Prime 2
A Mixer & Browser Controls
B Deck Controls
C Pads
D Effects
E Microphone Controls
F In & Out Controls
G Main Screen
H Front & Rear
MIXER & BROWSER CONTROLS

- CROSSFADER. Blends audio between the channels assigned to the left and right side of the crossfader.
- VOLUME. Volume Faders for Left/Right Mixer channel
- CUE/PFL. Use these buttons to send Left/Right channel's pre-fader signal to the Cue Channel for monitoring. When engaged, the buttons will be lit.
- FILTER Apply the selected Color FX (High-Low Pass Filter by default) to the left/Right Mixer channel. The selection of the Color FX is offered from the VirtualDJ main GUI.
- EQ LOW/MID/HIGH. 3-Band Equalizer knob to adjust the low (bass) / middle (mid) / high (treble) frequencies of the Left/Right mixer channel.
- LEVEL. Adjusts the audio level (gain) of the Left/Right Mixer channel.
- BACK : Sets focus to the Folders list of Browser. If focus is on Folders list, open/close sub-folders.
- FWD : Toggles Browser focus between Songs list and Sideview.
Hold SHIFT and then use this button to cycle through the available lists of Sideview (Automix, Sidelist, Karaoke, Sampler and Shortcuts) - BROWSE : Scrolls through Files and Folders in the focused Browser list.
Hold SHIFT down and then use this encoder to zoom in/out the vertical Scratchwave - LOAD : Loads the selected track from Browser to the Left/Right Deck.
Double-fast-press this button to clone the Track (and its position, tempo, playing status) from the other Deck to the called one.
Hold SHIFT down to unload the Deck - MENU : Toggles between Browser view (Large Browser - mini Decks) and Decks view on the Prime 2 screen.
Hold down for more than 1 second to open the Settings view on the Prime 2 screen.
Hold SHIFT down and use this button to how/hide the Pads panel of the Prime 2 screen. - MASTER VU METER Indicate the output level of the Master Output. Independent Hardware operation, not reflecting VirtualDJ Master VU Meter of VirtualDJ GUI
- PHONES MIX Use this knob to blend Master Output signal with the Channels that have the CUE/PFL buttons enabled. When the knob is at the minimum position, only audio coming from the channels that have CUE/PFL enabled will be sent to Headphones. When in maximum position only audio signal from Master Output will be sent to the Headphones channel.
Independent Hardware operation, not controlling VirtualDJ Headphones Mix knob but its movement is visible on VirtualDJ GUI - PHONES LEVEL Adjust the Volume of the Headphones Channel.
Independent Hardware operation, not controlling VirtualDJ Headphones Volume knob but its movement is visible on VirtualDJ GUI - SPLIT CUE Use this button to send Master Output signal to one side of the Headphones and the CUE/PFL channels to the other one.
Independent Hardware operation, not controlling VirtualDJ Split Cue setting
DECK CONTROLS

- SSHIFT: Press and hold this button to access secondary functions of other controls on the Prime 4
- PLAY. Plays / Pauses the track. Hold SHIFT down and then press this button to "stutter-play" the track from the last set Cue Point.
- CUE. When the Deck is paused, you can set a temporary Cue Point by moving the Platter to place the Audio Pointer at the desired location and then pressing the Cue Button.
During playback, you can press the Cue Button to return the track to this Cue Point. (If you did not set a Cue Point, then it will return to the beginning of the track.).
If the Deck is paused, you can press and hold the Cue Button to play the track from the Temporary Cue Point. Releasing the Cue Button will return the track to the temporary Cue Point and pause it.
To continue playback without returning to the Temporary Cue Point, press and hold the Cue Button, then press and hold the Play Button, and then release both buttons.
Press and hold SHIFT and then press this button to return to the beginning of the track. - BEAT JUMP. Use these buttons to seamlessly move track forward/backwards by the same amount of beats as the selected loop size. Hold SHIFT down and then use these buttons to fast seek through the track backwards/forward by 4 beats while pressed.
- TRACK SKIP. Use the Left Track Skip button to jump to the beginning of the track. Double-press the same button to load the previous track from the Browser List.
Use the Right Track Skip button to load the next track from the Browser List. - CENSOR. Press this button down to play the track in reverse. When the button is released, the track will continue playing from the position it would have been if never used (CENSOR)
Hold SHIFT down and then press this button to play the track in reverse mode. - LOOP IN. Press this button to set current position as the Start point (Loop In) of a manual loop. When a Loop is enabled, press this button to set Jogwheel to Loop In Adjust mode and use the Jogwheel to fine adjust the position of the Loop In point in time.
- LOOP OUT. Press this button to set current position as the End point (Loop Out) of a manual loop. When a Loop is enabled, press this button to set Jogwheel to Loop Out Adjust mode and use the Jogwheel to fine adjust the position of the Loop Out point in time.
- LOOP AUTO. Turn this encoder left/right to half/double the size of the Loop in beats. Push the encoder to enable an auto-loop of the selected size in beats or push to exit the loop.
When Track is in Loop, hold SHIFT and then turn the encoder to move the loop backwards/forward by 1 beat - JOG. Touch sensitive jogwheel. Use the jogwheel to scratch (if Vinyl mode is selected) or pitch bend. The Jogwheel also offers Loop In and Loop Out point adjustment (see Loops keys above)
Hold SHIFT and then use the Jogwheel to fast search through the track.
The Wheel Display will show the Album Art of the loaded track and 2 led rings will indicate the needle/rotation position and the slip mode position (when enabled) - STOP TIME. Use this knob to set the time the track needs to completely stop when paused/stopped. When set to Fast, track will stop immediately and will perform a brake effect when in any other position.
- VINYL. Press this button to set the Jogwheel to Vinyl (Scratch) or CD (Bend) mode. In Vinyl mode, use the outer part of the Jogwheel to bend (temporary speed up – slow down the tempo of the track).
- SYNC. Press this button to automatically match the corresponding Deck's tempo and phase with the opposite Deck's (or the Master Deck’s if using a 4 decks Skin) tempo and phase.
Hold SHIFT down and then use this button to smoothly reset Tempo to its original value. - KEYLOCK. Press this button to "lock" the track's key to its original value regardless the Tempo.
Hold this button for more than 1 second to match deck's key with the key value of the opposite deck
Hold SHIFT down and then use this button to reset the key of the track to it's original value - PITCH. Adjust the track's playback speed (tempo). When pitch is at the middle position (track is playing at its original speed), the white center LED will be lit.
- SLIP. Press this button to enable/disable Slip mode. When enabled, several actions like scratching, Hotcues, Loops etc will act temporary, and the track will resume playing from the position it would have been if the action was never triggered.
- PITCH BEND. Press and hold these buttons down to temporary speed up/slow down the song while pressed. When released, the track playback will return to the speed designated by the Pitch Fader.
Hold SHIFT down and then use this button to select the previous/next available % range of the Pitch Fader
PERFORMANCE PADS
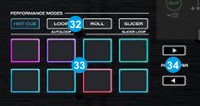
- PAD MODES. Use these buttons to select one of the 12 available modes for the Pads.
When moving from one Pad mode to another (first press of the Pad mode button), the primary Pad modes will be offered -Hotcues, Loop, Loop Roll and Slicer.
When one of the primary modes is selected, press the same Pad mode button again (2nd press) to get one of the secondary Pad modes - CueLoop, Manual Loop, BeatJump and KeyCue.
Hold SHIFT and then press any of the 4 Pad mode buttons to get 4 additional modes Remix Points, Saved Loops, Scratch and Sampler
Each time a mode is selected, a Page will be selected and displayed on the Pads section of the default VirtualDJ skin - PADS The functionality of each Pad depends on the selected Pad mode. Their functionality is explained in VirtualDJ User's Manual.
- PARAMETER < > Use these buttons to adjust the Parameter 1 (if available) of the selected Pads page
Hold SHIFT down and then use these buttons to adjust the Parameter 2 (if available) of the selected Pads page
EFFECTS
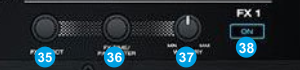
- FX SELECT. Turn left/right to select the previous/next available Effect.
Push to get a list of the available Effects on the Prime 2 screen UI, scroll to the desired effect and then push again to close the list. - FX TIME/PARAMETER. Adjust the 2nd Parameter of the selected Effect, usually the Beats value.
- FX WET/DRY. Adjust the 1st Parameter of the selected Effect, usually the Strength value.
- FX ON. Press this button to enable/disable the selected effect to the Left/Right deck.
The name of the selected Effect, its status (on/off) and the Parameter values will be displayed on the Prime 2 screen UI
MICROPHONE CONTROLS
The Denon DJ Prime 2 offers 2 Microphone inputs (connections at the rear) and this section offers their controls.
Note that the both the Microphone Inputs are not part of the USB Audio interface, meaning that their signals are controlled and processed by the hardware. All the buttons and knobs of this section send MIDI and could be mapped with a VDJ script action, but are un-assigned by default, as they perform hardware operation. If you need to assign them to a different action, keep in mind that the hardware operation will still be executed.
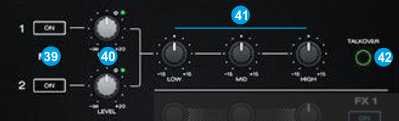
- MIC 1/2 ON/OFF : Turn on/off the Microphone 1/2 input.
- MIC 1/2 LEVEL : Adjust the output volume of Microphone 1/2 input
- MIC 1/2 EQ : 3-Band Equalizer (Low-Mid-High) for both Microphone Inputs 1 and 2
- TALKOVER. Enable/disable the Talk-over mode. When enabled, the Master output volume will be reduced if a signal is detected from a Microphone input.
MASTER - BOOTH - AUX
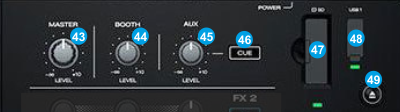
- MASTER LEVEL. Adjust the level of the Master Output. Hardware operation, but movement visible in VirtualDJ GUI.
- BOOTH LEVEL : Adjust the volume of the Booth output (connection at the rear)
- AUX LEVEL : Adjust the level of the AUX input (connection at the rear panel). The signal of this Input will be routed directly to the Master Output, but will be recorded along with your mix
- AUX CUE : When enabled, the signal of the AUX input will be routed to the Headphones channel for monitoring.
- SD CARD : Insert an SD-Card. It's content will be available from VirtualDJ Browser when Prime 2 is in Computer mode
- USB 1 : Connect a USB storage device. Their contents will be available from VirtualDJ Browser when Prime 2 is in Computer mode
- EJECT : Press before ejecting a USB storage device.
FRONT & REAR PANELS

- POWER ON/OFF: Use the Power Switch to turn the unit on and off. Turn on unit after all input devices have been connected and before you turn on amplifiers. Turn off amplifiers before you turn off unit
- POWER IN: Use the included AC cable to connect Prime 2 to a power outlet. While the power is switched off, plug the cable into unit first, and then plug the cable into a power outlet.
- USB 3/4. Connect other USB devices in the ports of this USB hub. Keep in mind that the devices connected to these ports will not be available as computer devices, when the Prime 2 is on Standalone (Engine) mode.
- USB B. Use the provided USB type B to type A cable to connect the unit with a USB port of a computer. This USB connection sends and receives audio and control information from a connected computer.
- LINK.Not used in VirtualDJ
- BOOTH OUT (XLR): Use XLR cables to connect this output to a booth monitoring system. The level of this output is controlled by the Booth Level knob on the top panel.
- MASTER OUT (Balanced - XLR): Connect this low-impedance XLR output to a PA system or powered monitors. The level of this output is controlled with the Master Level knob on the top panel.
- MASTER OUT 2 (RCA): Use standard RCA cables to connect this output to a speaker or amplifier system. The level of this output is controlled by the Master Level knob on the top panel.
- AUX INPUT. Connect an auxiliary audio source to this input using standard RCA cable. The level of this input is controlled by the AUX level knob at the top panel.
- MIC 1 Connect a microphone to this socket, using a 1/4" cable or XLR. The audio signals of this input is routed directly to the Program Mix and Cue Mix. The level of the Microphone Input is controlled from the top-left panel
- MIC 2 Connect a microphone to this socket, using a 1/4" cable or XLR. The audio signals of this input is routed directly to the Program Mix and Cue Mix. The level of the Microphone Input is controlled from the top-left panel

Denon DJ Prime 2 - Front panel - HEADPHONES SOCKET. Connect your 1/4" or 1/8" headphones to this output for cueing and mix monitoring.
- CF ASSIGN. Use these switchers to assign each mixer channel to a side of the Crossfader. Select the A (Left) or B (Right) position to assign a deck to the left or right side of the crossfader. When in THRU position, the crossfader will not affect the output level of the mixer channel.
- XFADER CONTOUR. Adjusts the slope of the crossfader curve. Turn the knob to the left for a smooth fade (mixing) or to the right for a sharp cut (scratching). The center position is a typical setting for club performances.
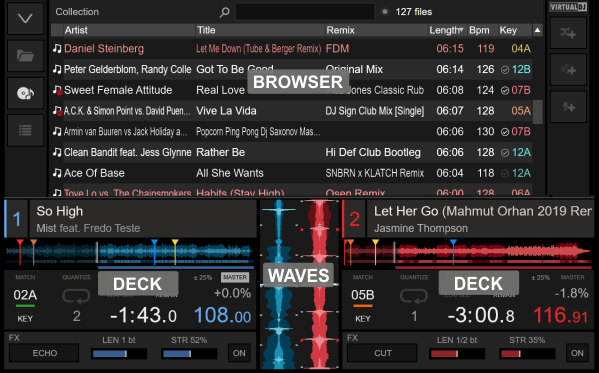
SCREEN
Prime 2 has a fully functional and customize-able 7" touch-screen offering all the information needed for your mix. The default GUI for the screen will be automatically downloaded the first time you connect the Prime 2 to a computer running VirtualDJ (Internet connection is required at least for the 1st time)
The default GUI of Prime 2 offers a Decks view with the ability to hide the Pads section, and a Browser view with Large Browser and Mini Decks, along with a view for Settings.
Hold SHIFT down and then press the [VIEW] button on the Prime 2 to show/hide the Pads section.
Use the VIEW button to toggle between the Decks view and the Browser view (with Mini Decks)


DECKS
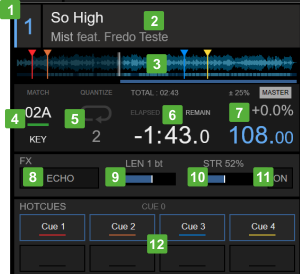
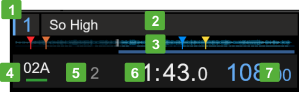
Tap this area to get more key controls at the Deck info area.
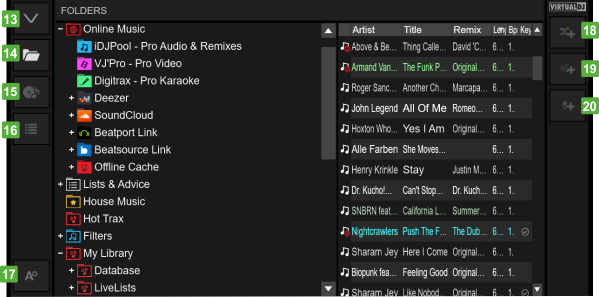
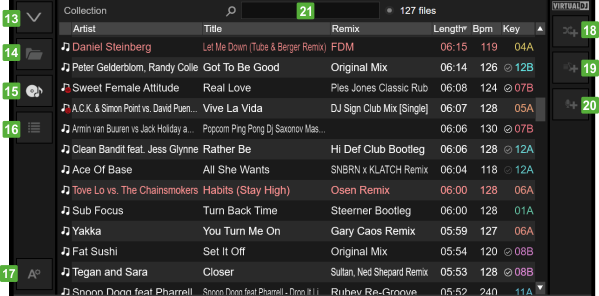
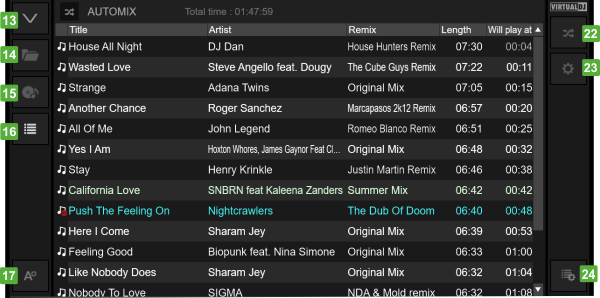
BROWSER
WAVES
The Waves area will display the Vertical Scratch waves of the Left and Right assigned Deck. The waves can be hidden, locked (from accidental touch) or displayed in different colors and types, depending on the settings that can be found in the WAVES tab of SETTINGS view
SETTINGS
Hold down the [VIEW] button for more than 2 seconds to get the SETTINGS view. Press the VIEW button again to go back to the Decks view.
Various settings are offered to adjust views, Waves, Browser behavior etc. and their values will be kept across sessions. A description of each setting is displayed at the bottom of the view, each time you tap, select or change a setting.
The Settings view will also offer a button to revert to Standalone mode, without exiting VirtualDJ.

INPUTS & RECORDING
MICROPHONES
The Denon DJ Prime 2 offers 2 Microphone inputs (connections at the rear panel) and various controls at the top-left panel for both of them. Both Microphone inputs are not part of the USB Audio Interface, and cannot be included in VirtualDJ Audio setup. None of the Mic controls of the device will control mic-related VDJ actions or GUI buttons and vice-versa.
Even though all Mic controls of Prime 2 send Midi messages and could be assigned to any VDJ script action, it is strongly advised not to do so, as the hardware operation will still apply.
RECORD-BROADCAST
The Denon DJ Prime 2 offers a dedicated Record input and this is part of the default Audio setup. As long as the setup is as per the following image (includes the Record line to Chans 1,2), your mix will be recorded including the signal from the Microphone and AUX inputs.
If for some reason you don't want the Inputs to be recorded, or the recorded signal is low, you can remove this line and your mix will still be recorded.

AUX INPUT
The Prime 2 offers an AUX Input (connection at the rear panel) and a AUX LEVEL knob at the top panel to control its level. This input is not part of the USB Audio Interface, so cannot be used in VirtualDJ Audio setup as Line Input or DVS (timecode) input. The signal of this Input will be directly routed to the Master/Booth output.
The signal of this input will be available (and heard to Master output) regardless the mode (Standalone or Engine) the Prime 2 will be.
STANDALONE MODE
The Denon Prime 2 can operate either in Computer mode (using VirtualDJ or other supported DJ application), or in Standalone mode using the integrated Engine. However there is no back-to-back operation or an easy changeover between the 2 modes, as you will need to "close" one system first, before you "open" the other one.
A smooth transition between the 2 modes can be achieved though. While in Computer mode, you have the ability to connect an auxiliary audio/media source to the AUX Inputs and control its volume with the AUX Level knob at the top panel Then while this source is playing, you can switch from one mode to the other without notice.
